Video Tutorial: ConfigMgr cloud integration Part 7 – Cloud Management Gateway
This post has been republished via RSS; it originally appeared at: Configuration Manager Blog articles.
Hello everyone, here is part 7 of a series discussing the integration options between ConfigMgr and the Microsoft cloud platform. This series based on ConfigMgr 1810 is recorded by , a Microsoft principal premier field engineer.
This session presents the cloud management gateway (CMG) and focuses on configuration, CMG functionality and troubleshooting.
Next in the series we will go over imaging and provisioning in Azure.
Posts in the series
Go straight to the playlist
Configure the new cloud management gateway in HTTP mode
How to configure a cloud management gateway (CMG) in HTTP modus…(thus without a PKI infrastructure… sort of)
Intro
So Tom, yet another CMG blog ? Aren’t there enough blogs on this topic already ??
Well… I’ve done a few CMG setups now and altough there are some great blogs out there, I got the feeling that not all topics were properly covered. In my 5 parts series on setting up Co management, I started off with setting up the CMG.
At this point in time it was a CMG “gen1” and required considerably more effort to get it working. In the meantime, Microsoft released a “gen2” CMG that is a lot easier to set up and best of all, doesn’t require your clients to connect over HTTPS
CMG Functionality
The ability to manage your clients over the internet is such an amazing thing! It will help keep your clients more secure than ever, especially those road warriors that hardly ever come into the office. All of that without opening up firewall ports that will expose your on-premise infrastructure to the internet. With the rapid release cycles of SCCM current branch, new functionality is added to the CMG with every iteration of SCCM. See here for more details
Some of the latest additions related to CMG are :
User-targeted software distribution
Windows 10 in-place upgrade task sequences
CMPivot for real-time interaction with your clients
(On top of that, the realtime scripts feature works over the CMG but that was added in a previous release already)
As of SCCM 1806, the CMG also supports the “cloud distribution point” functionality. This means that you don’t have to configure a separate CDP to enjoy the full functionality of the cloud management gateway. The good thing is, Internet-based clients don’t rely on boundary groups. They only use internet-facing distribution points or cloud distribution points. If you’re only using cloud distribution points to service these types of clients, then you don’t need to include them in boundary groups.
Requirements
When you configure a cloud management gateway, the goal is to manage clients over the internet. That’s fairly logical. When a client is not connected to the corporate network, there is no domain controller available to confirm your identity. Since we only want to manage our “own” machines, we must have a way to prove our identity to the CMG. This can be done in 2 ways.
with a computer certificate… But then we are back to the HTTPS mode that we want to avoid. with Azure AD.
So a requirement is that your machines are Azure AD joined ! I won’t cover that specific topic in this blog as that’s beyond the scope, but an easy way to verify if your machines are Azure AD Joined is running the following command from an admin command prompt : DSREGCMD /Status
That should show a similar result to this :
If you notice issues with being Azure AD joined, make sure to check the “workplace join” eventlog, or use your favorite search-engine and search for DSRegCMD troubleshooting. That should set you in the right direction.
Another requirement obviously is an Azure subscription that can “host” our CMG. (a “pay as you go” subscription will do)
And finally, we still need to talk certificates… Just like our clients need to “prove” their identity, the CMG endpoint needs to do the same so your clients know they are talking to a trusted resource. That can be solved in 2 ways :
You use a public certificate that you purchased You create 1 certificate from your PKI that you will use to secure your CMG URL.
Given that I have a PKI in my lab, I will use option 2 since that’s the only thing we need to do, but I’ll provide the instructions for 1 as well so you can install and configure your CMG without any self-created certificate.
Preparations
The Certificate requirements - Internal PKI
Although we won’t need a certificate until further down this blog, I want to tackle this now so you can finish the rest of the blog without issues. As I’ve said before, you either need a public certificate or a private one.
Before going down either route, we’ll need to verify that our FQDN is still available. Logon to your Azure portal and search all services for “Cloud Services (classic)”. Click ADD and type the DNS name that you want to use. In my case it will be (yes, it always has to end on If the name you chose is still available, a green tick will show up, if it’s a red exclamation mark it means it’s already in use and you will have to find another one.
Also, make sure it is between 3 and 24 characters long and contains only alphanumeric characters. This DNS name will allow you to use hyphens (-) and other non-alphanumeric characters, but the CMG itself doesn’t support i!
note : DON’T create the cloud service as we don’t need it here! This step is just to verify that the DNS entry that we want to use is not taken.
To use a PKI-certificate, we need one with an exportable private key that supports server authentication, so let’s create that template first. Log on to your issuing Certificate authority and open the “Certificate Authority” snap-in from MMC.
Find the “Certificate Templates” entry and right-click to select “Manage”
Find the Web Server template and duplicate it.
Give it a proper name on the General Tab so you can easily recognize it (eg, Cloud Mgmt Gateway), Make sure that your domain computers can enroll on the Security tab and mark the private key to be exportable on the Request handling tab
Once that is done, close the templates console and in the Certification Authority console again, right-Click Certificate templates again and select New / Certificate template to issue and select your newly created Cloud Mgmt Gateway template.
Now that we have the template waiting for us, we need to generate the certificates we need. From any machine in your domain, start the MMC Certificates console for the local computer.
Open the Personal / Certificates node, Right-click and select All tasks / Request new Certificate.
Select the template that you previously created and click the link that warns you that more information is needed.
On the Subject Tab, Set the Subject name type to “Common name” and provide the name we verified in the previous step (in my case Click Add. This certificate will allow your CMG to prove its identity and your clients will trust it since it is provided by a an authority your clients trust. Click OK and Enroll.
Once Enrolled, Select the Certificate you just created, right-click it , select “All Tasks”, then Export. Follow the wizard but make sure you select “Yes, export the private key”. Leave the rest of the defaults and specify a password to protect your certificate.
That’s it, that’s all we need from a certificate point of view with an internal PKI setup.
The Certificate requirements - Public issues certificate
If you don’t have an internal PKI you can always purchase a “Server Authentication” certificate from any of the registered certificate authorities (GoDaddy, Verisign, …) However, you won’t be able to get them to issue you a certificate for since you don’t own However, you should be able to purchase something like “CMG.Yourdomain.Com”. But as I’ve stated before, internally our CMG is known as, for me, To resolve that “issue”, you need to create a CName record with your public DNS provider that will translate “CMG.Yourdomain.Com” to
Enhanced HTTP site systems
Next, we need to enable a pre-release featured called “Enhanced HTTP Site System”.
In order to do that, navigate to the Administration workspace / Updates and Servicing node / Features. You’ll be presented with a list of features that you can enable for additional functionality in your environment.
note : Pre-release features are features that are in the current branch for early testing in a production environment. These features are fully supported, but still in active development. They might receive changes until they move out of the pre-release category
Locate the “Enhanced HTTP Site System” feature and turn it On from the ribbon, or right-click it and select “Turn On” :
As the popup indicates, you need to close your Admin-ui and re-open it before you can use the feature.
If the “Turn on” button is greyed-out, it most likely means that you haven’t given consent to enable pre-release features. To give consent, follow this procedure :
go to the Administration workspace, expand Site Configuration, and select the Sites node. Click Hierarchy Settings in the ribbon. On the General tab of Hierarchy Settings Properties, enable the option to Consent to use pre-release features. Click OK.
Once the feature is enabled in your environment and you restart your Configmgr Admin-ui, we can continue “configuring” it.
go to the Administration workspace, expand Site Configuration, and select the Sites node. Select your Primary site and click Properties from the ribbon. On the Client Computer Communication tab, tick the box next to “Use Configuration Manager-generated certificates for HTTP site systems.
If your environment is properly configured and you publish your certificate revocation list online, leave CRL checking enabled. However, if for some reason this is not the case, it might be necessary to disable CRL checking for your clients. In my lab environment (as it is a LAB environment), I’m going to turn off CRL checking. If you are deploying the CMG in a production environment, be sure to check with the security department on how to handle CRL-checking.
Cloud Services
With the preparations taken care off, we can move on and configure the Azure related services. Navigate to the Administration workspace, expand Cloud services and select the Azure Services node. From the ribbon, select Configure Azure Services.
Select “Cloud Management” and specify a name to your liking and click Next.
If you haven’t configured any cloud related services before, you will be presented with an empty web and native client app. Click the Browse button for the Web app to create a new one :
Click the Create button and provide an application name : CMG Web App (or any other name that you like)
Click the “Sign in” button and provide Azure AD Admin credentials for your environment.
If you provided the correct credentials, your Azure AD Tenant Name will be filled-in
Repeat the process for the Native Client app (click Browse, then Create)
Provide the Application Name : CMG Native Client App (or any other name that you like) and again provide your Azure AD admin credentials.
The end-result should look something like this :
Now you are ready to click Next to advance in the Azure Service Wizard.
Select if you want to enable Azure AD User Discovery. This isn’t a hard requirement for the Cloud Management Gateway as such, but if you want to target users over your CMG, you need to deploy to Azure AD users. Chose if you want to enable Azure AD User Discovery. (you can always change this later if required!)
Click Next twice to finish the wizard.
The result of what we did here can be seen in Azure. Login to the Azure portal and open “App registrations” and you should find the 2 web apps we created just before :
Creating the Cloud Management Gateway
Finally ! We are ready to create a Cloud Management Gateway. Believe it or not the hardest part is over :)
Navigate to the Administration workspace, expand Cloud services and select the Cloud Management Gateway. From the Ribbon, select “Create Cloud Management Gateway”
Starting in ConfigMgr 1802, you can create the CMG using an Azure Resource Manager deployment. Azure Resource Manager is a modern platform for managing all solution resources as a single entity, called a resource group. When deploying CMG with Azure Resource Manager, the site uses Azure Active Directory (Azure AD) to authenticate and create the necessary cloud resources. This modernized deployment doesn’t require the classic Azure management certificate.
We’ll continue this blog using the ARM way, as the classic way got depricated with SCCM 1810.
Again, sign in with an AAD account that has sufficient rights to access your Azure subscription. Once you’ve done that, the rest of the details will be filled out automatically
Click next to access the next part of the wizard.
Let’s start with the certificate again (either a public or a private one that we created before) and click the Browse button. Browse to your PFX file, provide the certificate password and click OK. The result should be that your Service name and service FQDN should be filled out now.
Select the region that is appropriate for you and either add it to an already existing resource group or just create a new one with a name that you like. Notice that you can already spin up more than 1 CMG for load balancing if needed,up to 16. Note : Again, depending on how well your internal PKI is set up, it might be necessary to uncheck the box next to “Verify Client Certificate Revocation”
Last, but not least, you can choose to enable Cloud DP functionality for your CMG. I would strongly recommend you enable it as this will greatly improve the functionality of your CMG. If all is well, your screen should look similar to mine :
Click Next to continue the wizard. Initially, accept the default settings for Alerts. Once your CMG is in use and up and running, you can monitor those values and adjust the alerts to more appropriate values for your environment. Finish the rest of the wizard.
At this point, SCCM will reach out to azure and create your CMG and storage account. This will take a while to complete and I always wait for this part to be complete (but you don’t have to…)
Your status should show that provisioning started :
You can monitor CloudMGR.Log for progress if you like logs :)
Once done (it took about 5-10 minutes in my lab), it will show provisioning completed :
If you would check Azure now, you’ll find a resource group with the name you selected and 2 items in there. A classic Cloud service and a storage account. Check the Side-Track in my older post on the CMG if you want to enable RDP access to your CMG (for troubleshooting).
Wrapping things up
Cloud management gateway connection point
We need to add a Cloud management gateway connection point. In your Admin-UI, navigate to the administration pane / Site Configuration / Servers and site system roles and right-click your primary site. Select “Add site system Role” and select the box next to “Cloud management gateway connection point”.
The log file for this specific role is called “SMS_Cloud_Proxyconnector.Log”
Just complete the wizard. All details should be pre-filled out.
Notice that a new Site System was created in the meantime if you enabled the cloud distribution point for your CMG. Also, don’t forget to add that Cloud DP to any of your distribution point groups!
Enabling CMG traffic
In the Site System roles pane find the Management point role and Enable the checkbox for Allow Configuration Manager cloud management gateway traffic.
Repeat this process for the Software Update Point (if wanted/needed).
Client Settings
Make sure that all our hard work pays off and verify that your clients are allowed to access the CMG :) Check your client settings / Cloud Services and enable access to both the CMG and Distribution point
From an SCCM point of view, we are done ! Now let’s see if we can actually connect
Validation
If you would check your CMG now and click on the tabs “Connection Points” and “Role Endpoints”. It could very well be that you don’t see anything listed there yet. Don’t despair just yet, those endpoints are only created after your first client tries to reach out to the CMG !
The same is true for the SMS_CLOUD_PROXYCONNECTOR.Log.
Windows 10 Client
Remember, as with anything client related in ConfigMgr, a policy needs to make its way down to your client before it is actually aware that there is such a thing as a cloud management gateway. So, logon to your Windows 10 device that is still on your local lan and do a machine policy refresh.
You can verify that your client is aware about the existence of the CMG by running the following PowerShell command from a client :
gwmi -namespace rootccmlocationservices -class SMS_ActiveMPCandidate | Select-Object -Property MP
The output should show you all available management points including the CMG
Once you verified that your client has the necessary policies, switch it to a non-corpnet environment and verify that it is indeed on the Internet from the Configuration Manager applet :
Now, go ahead and try to install anything from software center. If all steps were followed correctly, your client should download and install what you selected.
Beyond the scope
The above steps should be sufficient to get you started, but there were a few other points I wanted to touch on lightly
Cost
When you bring up the Cloud Management Gateway, the question of the variable cost comes up sooner rather than later :) It’s becoming a running joke but chances are that you are paying more for regular stamps in your office than you will for the cloud management gateway.
Your CMG cost will be made up out of these 3 components :
The CMG Virtual machine
The Azure blog storage cost for the Cloud DP
The Egress data Either clients requesting policy or content being transferred from the cloud DP to your clients
Let’s check that with the Azure pricing calculator
Add the “Virtual Machines”, “Storage” and “Bandwidth” views to your calculator if you want to simulate your own cost.
For the Virtual machine, the CMG uses a standard A2 v2 virtual machine. According to the calculator, this breaks down into $99,28 / month
For the storage, The Cloud DP uses General purpose Blob storage with LRS redundancy. If I take a capacity of 1TB, it comes down to $22,44. Again, make sure to adjust the numbers to your own needs, but as you can see, storage is not hugely expensive
And finally Egress data, the bandwidth cost for all data leaving the Azure datacenter to your clients.
Let’s make the following assumption, if a client is connected to the CMG 24hours a day, 7 days a week, for a full month, on average it will consume 350mb of egress data just requesting policy every hour. Obviously if you start downloading content for applications, that number will go up. Then again, most clients will not be connected 24/7 to the internet/cmg.
For this excercise, I’ll callculate 1 TB of egress data, or roughly 2800 clients that are constantly connected to the internet requesting policy. Or you can average 1GB/client/month if we add some content transfer to the mix and we can still support 1000 clients before we hit 1TB of egress data. This cost will probably be the most difficult to “predict” but in my example, this will accumulate to $88,65
So there we have it, if we calculate the total, we come down to $210 for 1 month of CMG usage.
And, according to me, some rather high assumptions for storage and egress.
Make sure to run the numbers for your own company but my advise is, just install the CMG/CDP and let it run for a few months. Chances are indeed that the time you spend on researching the CMG cost and the cost of mail stamps exceed that of the actual CMG cost in the end.
If at the end of the day, the cost is indeed to high for the value you get out of it, you can always uninstall/remove the CMG again, but my bet is that won’t be the case.
Troubleshooting
I won’t go into to much detail on troubleshooting but there is a variety of logs that can help you with troubleshooting.
Server Side Logs :
CloudMgr.log & CMGSetup.log (deployment issues)
CMGService.log & SMS_Cloud_ProxyConnector.log (service health issues)
CMGHttpHandler.log, CMGService.Log, SMS_Cloud_ProxyConnector.log (client traffic issues)
Client Side Logs :
ADALOperationProvider.log (AAD token issues)
And don’t forget that the Cloud Management Gateway Connector Analyzer exists to help you troubleshoot issues between your site server and the CMG. Anoop has a nice blog on SCCM CMG troubleshooting here
That’s it folks ! Hope you enjoyed reading this blog and feel free to comment if something is not clear.
Enabling the ConfigMgr administration service through the cloud management gateway
This week is all about the administration service in Configuration Manager. More specifically, about enabling the Configuration Manager administration service via the cloud management gateway (CMG) to make it available over the Internet. The administration service provides API interoperability access to WMI over HTTPS via the SMS Provider. This REST API can be used in place of a custom web service to access information of the Configuration Manager site. Some really good information and starting points about this subject can be found at this blog post by Adam Gross. In this post I’ll skip the basics and specifically look at making the administration service available over the Internet. I want to provide in my own style what the configuration requirements are and why they are needed. I’ll start this post by showing the required configurations in Configuration Manager and in Azure AD and I’ll end this post by retrieving the most common parameters for scripting.
Before starting with the actual configurations, I want to post a little thank you message: Thank you Sandy for answering my (dumb) questions while I should simply read better.
Configuring the SMS Provider properties
The administration service is available with the installation of the SMS Provider. Every site system with an SMS Provider has the administration service. Before being able to enable the SMS Provider over the CMG, the following prerequisites should be in-place:
The server that hosts the SMS Provider role requires .NET 4.5.2 or later
Enable the SMS Provider to use a certificate, by either using Enhanced HTTP or by manually binding a PKI-based certificate on the server that hosts the SMS Provider role
manually binding a PKI-based certificate on the server that hosts the SMS Provider role A running CMG (as I’m not going through that installation)
When those prerequisites are in-place, the SMS Provider can be configured to allow CMG traffic for the administration service by following the next three steps. Open the Configuration Manager administration console and navigate to Administration > Overview > Site Configuration > Servers and Site System Roles Select the server that hosts the SMS Provider role, select the SMS Provider role and click Properties in the Site Role tab to open the Provider role properties dialog box On the Provider role properties dialog box, select Allow Configuration Manage cloud management gateway traffic for administration service and click OK Figure 1: Allow traffic for the administration service
Register a new app with Azure AD
For accessing the administration service via the CMG, two apps must be created within Azure AD, 1) a Web app (also known as a Server app within Configuration Manager) that is used for making the administration service available and 2) a Native app (also known as a Client app within Configuration Manager) that is used for obtaining an access token for the user. That access token can be sent in a request to the Web app, which authorises the user and returns the administration service.
During the creation of the cloud services within Configuration Manager a Web app and a Native are already created. I need to (and can) access the administration service via that created Web app, but I don’t want to reuse the existing Native app as I need to make some adjustments and I don’t want to interfere with existing functionalities. The following steps walk through the registration and configuration of a new Native app with the required configurations to obtain and access token for the user and be able to sent that token in a request to the Web app.
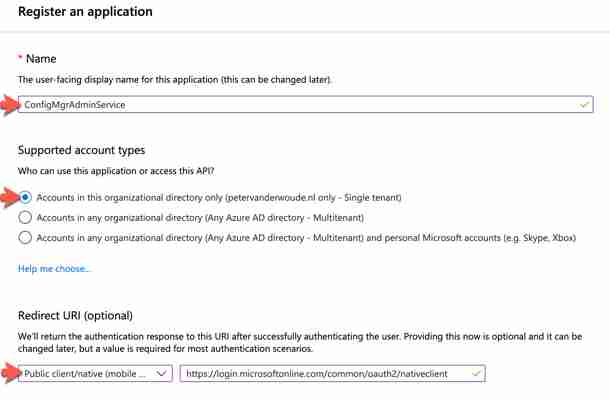
Open the Azure portal and navigate to Azure Active Directory > App registrations to open the App registrations blade On the App registrations blade, click New registration to open the Register an application blade On the Register an application blade, provide the following information (as also shown below) and click Register
Name : Provide a valid name for the Web app (in this post: ConfigMgrAdminService)
: Provide a valid name for the Web app (in this post: ConfigMgrAdminService) Supported account types : Select Accounts in this organisational directory only ({yourTenant} only – Single tenant)
: Select Redirect URI (optional): Select Public client/native (mobile & desktop) and provide as Redirect URI
Figure 2: Register and application
Note: The mentioned redirect URI, is the latest recommended value for desktop applications running on Windows (see also:
After the registration of the app, navigate to Authentication to open the Authentication blade On the Authentication blade, navigate to the Default client type section and select Yes with Required for the use of the following flows where a redirect URI is not used (as shown below) and click Save
Figure 3: Default client type
Navigate to API permissions to open the API permissions blade On the API permissions blade, click Add a permission to open the Request API permissions blade On the Request API permissions blade, select APIs my organisation uses and select the Web app – the standard name of that app is ConfigMgrService (as shown below) – that was initially created during the setup of the cloud services to open the specific API permissions blade
Figure 4: Select an API
On the specific API permissions blade, select Delegated permissions, select user_impersonation and click Add permissions (as shown below) to return to the API permissions blade
Figure 5: Select API permissions
On the API permissions blade, select Grant admin consent for {yourTenant} (as shown below
Figure 6: Grant consent
Retrieve the parameters to start with PowerShell
After configuring the SMS Provider properties, registering and configuring the Native app, the administration service is available via the CMG. The next step is to actually externally connect with the administration service. However, this might be an open door, but before doing that it’s good to understand that the user that is authentication and connecting with the administration service must have sufficient permissions within Configuration Manager.
At this moment I won’t provide an example, that might be something for a future post, but for now I’ll refer to this great post by Zeng Yinghua (also known as Sandy) and this repository about the Microsoft Graph (as the idea for retrieving a token is the same). The main challenge in any of those scripts is getting the token. To successfully achieve that, the following information is often required.
Application (client) ID of the Native app that is named ConfigMgrAdminService in this post. That information can be found in the Azure portal at Azure Active Directory > App registrations > ConfigMgrAdminService > Overview (shown in the figure below with number 1). Tenant ID of the Native app that is named ConfigMgrAdminService in this post. That information can be found in the Azure portal at Azure Active Directory > App registrations > ConfigMgrAdminService > Overview (shown in the figure below with number 2). Redirect URI of the Native app that is named ConfigMgrAdminService in this post. That information can be found in the Azure portal at Azure Active Directory > App registrations > ConfigMgrAdminService > Overview (shown in the figure below with number 3) or copying the information that was provided in step 3 during the registration of Native app in Azure AD.
Figure 7: Native app overview
Application ID URI of the Web app that is named by default ConfigMgrService. That information can be found in the Azure portal at Azure Active Directory > App registrations > ConfigMgrService > Overview (shown in the figure below with number 4)
Figure 8: Web app overview
External URL of the administration service. That information can be the easiest retrieved in SQL by using the query below on the ConfigMgr database
select ExternalEndpointName, ExternalUrl from vProxy_Routings where ExternalEndpointName = 'AdminService'
Figure 9: Administration service external endpoint
More information
For more information about Configuration Manager administration service, please refer to the documentation about the SMS Provider.
Leave a Comment